Delboy1940Essex/FlickrHarry Potter author J.K. Rowling's property in Scotland, the Killiechassie Estate, reportedly will add a new structure.APJ.K. Rowling
In another great example of life imitating art, Harry Potter author J.K. Rowling is planning to build a summer house on her Scottish estate that looks suspiciously like the "Hagrid Hut" where her giant and beloved character lived.
The Western Daily Press reports that, like Hagrid's gamekeeper hut, the new, circular structure will open to the front, and have a stone bench and slate roof. It will be situated on the edge of a forest on Rowling's 19th century, 162-acre Killiechassie Estate, located on the upper reaches of Scotland's River Tay.
Doug Kline/Flickr Hagrid's Hut as depicted at the Wizarding World of Harry Potter attraction.
The building application was reportedly submitted by Rowling's husband, Dr. Neil Murray, and recently approved by local Perth and Kinross Council planning officials. The council reportedly stipulated that no trees can be damaged or cut down during construction.
In 2012, Rowling sold another home that she owned in Scotland, a sprawling eight-bedroom Victorian house -- also constructed of stone -- in the capital of Edinburgh, where she lived with her husband and children while writing many of the Potter books. It reportedly sold in three weeks after being listed for $3.7 million.
Sotheby's International RealtyJohn Legend and Chrissy Teigen's home was redesigned to have an Asian-inspired, open living plan. APChrissy Teigen, left, and her husband John Legend
What becomes a Legend most? Apparently not the Hollywood Hills home that R&B singer/songwriter John Legend and his supermodel wife, Chrissy Teigen, are selling for almost $2 million. Legend bought the Los Angeles house in 2007 for $1,512,500, says listing agent Sotheby's International Realty. He gutted the 2,200 square-foot-space, built in the 1960s, and replaced it with an Asian-inspired, open living plan that was featured in an Architectural Digest spread.
Legend uses one of the home's three bedrooms as a studio where he reportedly recorded several songs for his current album, "Love in the Future." (Take a video tour of the property below.)
The young couple, who married last year in Italy, want to move up. Legend told the Wall Street Journal the home feels a bit small. Could that mean another Legend is about to be born?
Pregnancy rumors were sparked recently by a suspicious looking photo of Teigen. But the photo was a "bad angle," not a baby bump, Legend reportedly told "Extra" last January. He then added, "We're practicing every day."
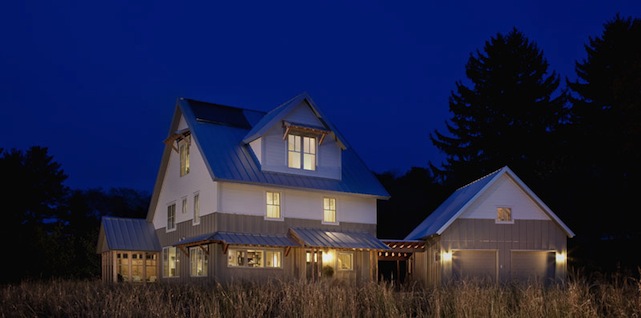
Photo courtesy of Trent BellThis home cost about $175 a square foot to build and is close to net zero with the addition of more photovoltaic panels.
Years ago, it was difficult to build a very energy efficient house because there was a lack of technology and materials -- such as extremely energy efficient insulation and triple-pane windows. The cost for solar panels was also high and subsidies were non-existent. Today this is not the case.
We know how to build houses to substantially reduce the use of fossil fuel and energy costs. You might then ask: Why aren't all houses built to a much higher energy standard? There are several answers to this question.
People aren't being forced to build more efficiently because the codes are not that stringent. Although they have improved over the years, most municipalities have a long way to go to be encouraging
"The up-cost for a very energy efficient house should be $0."
people to build low-energy or net-zero houses.
Another reason given for not building to higher energy efficiency is the cost. Homeowners wrongfully assume that it will cost a great deal more to build a more energy efficient house. In 2010, Habitat for Humanity built a house in Vermont to Passive House standards, using a tiny bit of energy and at a minimal cost. Many other houses have also been built in this country and around the world that are moderately priced and extremely energy efficient.
According to architect Phil Kaplan of Kaplan Thompson Architects, who designs many energy efficient houses in New England, "the up-cost for a very energy efficient house should be $0." He says, "If you increase window quality, increase insulation, reduce air infiltration, you reduce the cost of mechanical systems." When designing a house, Kaplan also designs the mechanical systems to make sure that he gets the right efficiencies in the completed house.
John Colucci, vice president of sales and marketing at Westchester Modular Homes, says the up-charge is minimal. He claims that a modular home may cost 3 to 5 percent more for a house that is 50 to 60 percent more efficient than the typical home. A house that is net-zero energy may cost up to 10 percent more. He points out that in the factory they are able to build a very tight house with
There is an assumption that very energy efficient houses are not particularly attractive.
advanced framing and extra insulation.
Tessa Smith of the Artisans Group, a Passive House designer/builder says: "We see a zero upgrade in our custom energy efficient homes in which spending more on insulation gets recouped by less expensive but sophisticated mechanicals, and by buying better windows, which we would anyway in this type of house.
"In our production-oriented houses (that are equally as efficient as our custom homes), we see an upgrade of between 5 to 10 percent (compared to a normal tract home) and a payback of around 6 years, depending on the project. The windows and mechanicals on these less-expensive houses are more energy efficient, of higher quality, and more expensive than the cheapest windows and mechanicals than you would normally find in a tract house."
The Artisan Group currently has a Passive House under construction that will cost $135 a square foot.
Nobody can say exactly what the return on the additional investment will be for all houses -- it varies with the products and systems used, location and the efficiency achieved. Everyone I've interviewed, with a very energy efficient house, however, agrees that their heating and cooling bills are substantially less than those of their neighbors with less-efficient houses.
There is an assumption that very energy efficient houses are not particularly attractive. But evidenced by the houses I've seen in this country and around the world -- this is definitely not the case. (Just see some of the beautiful houses that have been built to high standards in my recent book -- Prefabulous World: Energy-Efficient and Sustainable Homes Around the Globe.)
Global warming is generally accepted today as a scientific fact. It is caused by the entrapment of gases resulting from the burning of fossil fuel. Forty percent of that fuel in this country comes from the heating and cooling of houses and other buildings. I believe the environmental and financial savings pose a strong case for building a very energy efficient or even zero-energy home.
'Tis the season for haunted houses, and this house -- which recently sold for the whopping sum of $1 -- at least looks downright spine-tingling, even if no ghosts actually reside there.
Courtesy of Angelo VermeulenThe dome and its inhabitants occupy an abandoned quarry on the Mauna Loa volcano in Hawaii.
Unlike the popular CBS-TV series "Under the Dome," the inhabitants of this dome are in a self-imposed isolation, which began on Oct 15. Imagine spending eight months in a remote dome with five other people, with limited communication with the outside world. These six people were selected from 150 applicants with the primary purpose to examine the crew psychology of working and living together for an extended length of time.
This project is in preparation for a future trip to Mars that could take in excess of three years. This particular mission at the Hawaii Space Exploration Analog and Simulation, or HI-SEAS, habitat site is NASA-financed and is the third of four such studies currently planned.
The location is on a remote abandoned quarry at an 8,000-foot elevation on the Mauna Loa shield volcano in Hawaii, which resembles the surface of Mars. The site contains little vegetation, no rare, threatened or endangered species, and no archaeological sites. Access to the location will be blocked off for the duration of the project.
The Dome, supplied by Pacific Domes International, was designed by architect V. Paul Ponthieux of Envision Design and was built by the Blue Planet Foundation of Honolulu. The geodesic dome is two stories high, 36 feet in diameter with about 1,000 square feet of space.
"We have a solar panel array as the main source of power, with an H2 fuel cell for backup, and a gasoline generator (almost never used!) as a backup for that," says Dr. Kimberly Binsted, associate professor at the University of Hawaii at Manoa and the principal investigator for the project. "There are also solar hot water panels."
Regarding plumbing, Binsted says, "We have to bring in water (stored in two 500 gallon tanks). The habitat has two composting toilets and a septic tank."
The crew will have very small bedrooms -- just enough room for a smaller-than-single bed and a mini-desk. Each member is allowed to bring two suitcases of personal belongings, but no food or drink.
Communication will be limited to emails, which will have a 40-minute delay, which is approximately what it would be like on a spaceship traveling to Mars. Web surfing as we think of it is not possible because of the delay, but static sites, which do not require a delay, such as Wikipedia, can be accessed. Residents of the Dome also will be able to access their personal financial records so that they can keep an eye on their finances.
A medical doctor off-site will monitor their mental and physical health, and one of the crew was a field medic in the army and can deal with minor health issues. A cell phone will be available for immediate medical emergencies as well as natural emergencies, such as hurricanes, which may threaten the location.
With no television, Web surfing and outside cultural events, you might wonder what the crew will be doing with their time, but Binsted says "the group will be quite busy." They will have everyday-type chores and activities, such as interior and exterior maintenance, cleaning, cooking and exercise. Each of the residents also will have their own projects to work on.
For example, the commander of this mission, Martha Lenio will be researching sustainable living aspects while living in the dome. And several HI-SEAS crew members will be posting blogs about their "Mars" experience, including Zak Wilson at www.almostmars.com, and Jocelyn Dunn at fivestarview.blogspot.com, who has a passion for working at the interface of humans and technology.
The other crew members, Neil Scheibelhut, Sophie Milam and Allen Mirkadyrov will also be working on research projects. Two alternate crewmembers, Ed Fix and Michael Castro, will be available if one or two of the crew are required to leave the project.
Future missions are planned for this location, including a 12-month mission slated to begin in August 2015. For more information, visit hi-seas.org.
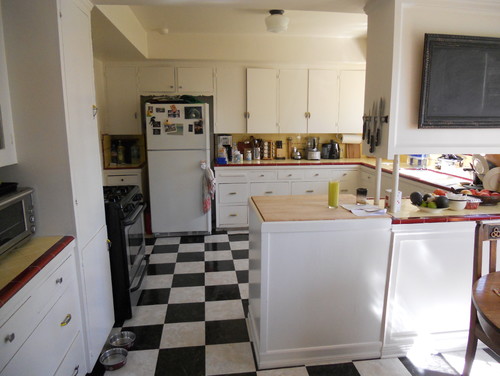
Sitting high on a hill overlooking Hollywood Boulevard in Los Angeles, this once-glorious house had been chopped up into rooms that had been rented to actors. Strange exterior doors from bedrooms and neglected spaces abounded. Seeking to bring the historic 1939 home back to its former glory, an adventurous young couple bought it and made plans for an extensive restoration. Rather than going for a strict historic restoration that wouldn't function well for their modern family, they sought to give it an essence that respected the original architecture and era. Using striking colors and materials that will patinate and gain character with age, principal designer Jeff Troyer helped them create a kitchen that matches the home's original glamour while functioning well for a growing modern family.
Kitchen at a Glance Who lives here: A couple with a 1-year-old. Location: Los Angeles. Size: 232 square feet (21½ square meters). Team: Design: JWT Associates; construction: Duane LaDage, Trueline.
BEFORE: During the era in which the home was built, kitchens were simple utilitarian spaces and not the important hubs they are today. An oddly placed peninsula (right) originally separated the breakfast room from the rest of the kitchen. A lack of windows and upper cabinets gave the room a chopped-up feeling and made it dark.
AFTER: Troyer removed the peninsula to combine the small kitchen and breakfast room into one large, open space. Now the entire room benefits from both windows, and the room is flooded with light. White tile helps keep it as bright as possible. The original windows were saved, offering views of Hollywood Boulevard and a tie to the past.
"These clients were really fun to work with -- they were well traveled, sophisticated and had a great art collection but were also quirky in a good way," the designer says. A few small details worth noting are the Carrara marble on the shelf beneath the bay window and the open cabinet shelves to the left, used for cookbooks. The owners are wine lovers, and the large glass-front refrigerator stores their collection.
"It was very important to keep this wall light; if you look at the situation before, you'll see why," Troyer says. Thus, he eschewed upper cabinets and made up the difference with extensive storage across the room.
Cabinet paint: Stiffkey Blue, Farrow & Ball; refrigerator, wine refrigerator, dishwasher: Miele; pendant lights: Satellite 3 with natural brass finish, Schoolhouse Electric;sinks: Julian; faucets: unlacquered brass, Newport Brass; reclaimed wood on island and on shelves: Croft House; range: Wolfe
Extensive storage on the opposite wall allowed for the open window wall. The space to the left serves as a pantry; the space to the right stores china and glass. The glass cabinet fronts and the proportions give the piece more the feel of a china cabinet-vintage butler's pantry than of typical modern cabinets, appropriate to the home's history.
The new island top is a mix of reclaimed pine and oak wood with a wax finish. "My clients loved the idea of bowling alley-like wood strips, so we used two different types of wood in thin strips," Troyer says.
A lucky budget saver: One of the homeowner's fathers is a contractor, and he just happened to have scads of beautiful handmade white 4- by 4-inch tile he wasn't using. "It has lots of character to it," Troyer says. He took full advantage, using it throughout the house (he also renovated bathrooms during a different renovation phase). He staggered the squares here, creating a fresh take that mashes up square tiles with a subway tile pattern. Saving on this item meant the owners could splurge on custom-painted ceramic tiles from Ann Sacks over the range.
One of the "living" finishes the couple opted for is brass, which is seen on the hardware, lights and faucets. It starts off looking shiny, but will age and patinate over time.
AFTER: Obviously, the brilliant blue paint is a major design element. When Troyer presented several material palettes to the couple during the first part of the design phase, they immediately fell in love with this daring hue.
The floor is antique cement tile from a monastery in France, acquired via Exquisite Surfaces. "After we installed this, we all agreed that the kitchen had soul," Troyer says. To go along with the floors, the couple chose a material that could quickly match the tiles' aged look: Carrara marble. "It will take on a life of its own as it stains and chips," he says.
Tip: Carrara marble is not for everyone; before investing, test it out to see if it's for you. When clients think they might want it, Troyer gives them a big piece to take home, lay atop their counter and abuse for awhile. If they see its imperfections as the marble's getting better with age, it's for them. If they freak out about stains and dings and want to keep it looking exactly as it did on installation day, it's not.
Vintage-looking wood shelves and iron corbels contrast with the elegant Carrara marble and serve as a bar area next to the wine refrigerator.
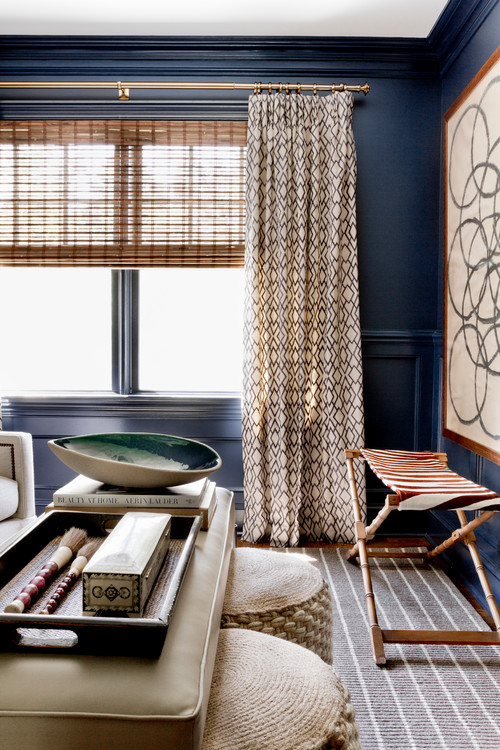
They tried calling it the music room, the den and the library, but no matter what they called it, no one in this family of four was using this room on their home's first floor. After meeting interior designer Becca Galbraith, they were open to anything that would stop the space from being wasted. "My clients knew they liked handsome fabrics, rich textures and dark colors," Galbraith says. "I suggested we do something dark and risky, and they were totally onboard." Comfortable seating, an elegant media center, reading lamps, patterns and layers of textures turned the room into one of the most sought-after spaces in the house.
Room at a Glance Who lives here: A couple and their 2 teenage children Location: Chatham, New Jersey Size: About 95 square feet (9 square meters)
The room is located right off a larger living room-family room. Galbraith began with a favorite Robert Allen fabric for the window treatments. Because her clients were not afraid to go with dark paint, she pulled an indigo hue straight from the fabric to use on the walls. The owners had added extensive millwork throughout the house a few years prior, including wainscoting and other molding. At first they were a little wary of covering everything with the color, but they trusted their designer and let her go for it.
She used Polo Blue by Benjamin Moore on everything, using a high-gloss finish on the millwork and an eggshell finish on the walls for a subtle contrast. The high gloss, accentuated by the lighting, gives the millwork its due.
Next she layered in texture. A striped rug grounds the room in light neutral color. Vintage and global-inspired finds add character. The X-stool was made from a vintage luggage rack. Galbraith was drawn to the bamboo base's color and texture, so she had her upholsterer replace the top with a hide. "An animal print always helps a room," she says.
Another interesting texture turns up on the stools, which can be tucked right in underneath the leather ottoman. "I knew I wanted something woven and kind of "ropey," she says. She found just the right extra seating with these CB2 pieces.
A TV was next on the owners' wish list. To preserve the millwork all the way around the room, the media casework is freestanding. Matching moldings make them look built in and protect the wainscoting behind them.
The TV practically disappears into the inky paint. Galbraith used a special Venetian plaster treatment on the back panels of the unit to add a little pizzazz. She used the same color as the walls and a gray wash. Antique brass library sconces add shine.
"That top shelf was a big gap, and I knew we needed something really cool to fill it," Galbraith says. She found it in the form of a vintage wooden Thai wheel from a sugar factory.
One of the homeowners wanted to be able to read in here and prop her feet up on the windowsill, so Galbraith chose comfortable upholstered swivel armchairs and swing-arm floor lamps.
The chairs are upholstered in a handsome tweed that adds more subtle pattern and texture. Luxe mohair throws and ikat pillows add comfort and style.
A vintage metal side table provides a convenient spot for drinks and the TV remote. "I wanted to add a little bit of edge to it," Galbraith says. "I didn't want to overkill with the brass, so I chose a bronzy finish for the lamps," she says. The antique brass upholstery nails can also take on a bronze cast.
The ottoman is another repurposed piece; originally it was a table. Galbraith had the top replaced with a leather-like vinyl upholstery. The woven stools are just the right height for being tucked underneath.
Tip: Artwork doesn't have to fit within molding. The piece in the room that packs the biggest design punch is one the homeowners weren't sure about at first. "I brought the art over on approval on install day, and they were asking where in the world it was going to fit," Galbraith says. "Once they saw it, they said it made the room - they absolutely had to have it."
Art: Peter Dunham
Final touches include this bowl with a gorgeous glaze that brings in a touch of aqua.
The new design of this room has made it a favorite spot where the teenagers gather with their friends and their parents curl up with books. "They used to call it the den and now they call it the gem," Galbraith says. "Everyone loves to hang out in here."
Galbraith is currently working on the family's dining room, and they hope to get to the living room next.
Shutterstock No one goes to showrooms to look at batt insulation, but it's critical to making your home energy-efficient.
Now that we are remodeling with energy efficiency in mind, we get asked a lot of questions by friends and neighbors. The most common, besides "how are you living through all that dust?" is "if I want to improve the comfort and efficiency of my home, which should I do first -- replace windows or add insulation to the walls?" The answer in most cases is insulation, but together they really perform.
Whether you are building to net zero or just want to lower your energy bills, windows and insulation are the blocking and tackling of home design -- one is flashy, the other not so much, but together they get
For our Long Beach house with no existing wall insulation and original wood windows from the '50s, the answer was clear.
the job done. If a house is a football team, windows are a noticeable star like a wide receiver.
Their impact on a house is dramatic, flashy and hard to miss. Insulation might be the left guard (see Michael Lewis' The Blind Side). The left guard doesn't get mention in the sports pages, but he protects the quarterback's back from charging defenders.
Reducing the energy load of the home is step 1 in net-zero design; sizing the solar array is the last step. So it's worth spending time on the X's and O's -- evaluating various options to improve the home's defense against unwanted heat gain or loss. Windows and insulation are definitely the key players here.
Which to do first of course depends a great deal on where you live, what your existing windows and walls are, and other factors like solar orientation, tree shading, etc. But for our Long Beach house with no existing wall insulation and original wood windows from the '50s, the answer was clear.
According to our energy models:
Going from nothing to R-13 walls will reduce our heating/cooling load by 33 percent.
Installing new low-e dual-pane windows (U/SHGC=0.30/0.29) will reduce our load by 14 percent.
Doing both is almost additive, generating a combined heating/cooling load savings of 46 percent.
That load reduction means that we reduce the number of solar panels we need on our roof. If the solar panels are the quarterback of the house, a solid defense against unwanted heat gain or loss means the panels can be more impactful and high-step into the end zone. With proper blocking and tackling, even
The stakes are higher than ever for energy efficiency....
a modest solar array has a shot at net-zero. That is real cost savings.
For us, the installation costs were roughly the same on insulation and windows. So performance bang-for-the-buck was best for wall insulation. And our game plan is to vary the type of insulation in each part of the house. Where we are opening walls, we can add traditional fiberglass batts. Where the walls are largely intact, we can drill a few holes and blow in cellulose insulation. Where we have a large attic space, we can super insulate with blow-in cellulose, reaching R-49 performance. Where our attics are narrow, like over the vaulted ceiling, we can use smaller batts and stop at R-19.
Windows come in an almost endless variety of options. In our analysis, springing for even more efficient windows (triple-pane, triple-coated) did not have payback relative to the extra cost. Why? Because our climate is fairly moderate. Move our house to Las Vegas or the Sierras and the high-end windows may have been worth the upgrade. Proper research makes these decisions clear.
So, why don't more remodels add insulation and windows?
Until now, most remodels were an exercise in making a home more livable, more useful and more attractive. But the game is changing. The stakes are higher than ever for energy efficiency, with several factors generating new interest in energy efficiency improvements like:
1. Rising energy costs.
2. Climate change consciousness.
3. Strict new energy codes encouraging the use of more energy efficient materials.
Innovation by product manufacturers.
But change comes slowly to the building industry, for many reasons. Many homeowners still perceive efficiency features as expensive and optional, and maybe even a little boring. No one goes to showrooms to look at fiberglass batts or cellulose, but they make a big difference in performance.
Builders and subcontractors are sometimes reluctant to try new materials and techniques; their profit on every job is at stake, and they need to work with partners and materials that are dependable. As a result, change filters through the industry only as fast as early adopters change and the competition forces the rest of the players to do the same.
And the industry still needs more financing products with reasonable rates, qualifying hurdles and application timelines. But we are optimistic that energy efficiency is about to have its best season yet. As costs decline, education improves and incentives promote change, the team will be unstoppable.
ZillowMichael Douglas and Catherine Zeta-Jones' latest Colonial-style home in Bedford is twice the size of their last one.APMichael Douglas, left, and Catherine Zeta JonesBy Catherine Sherman
The Oscar winners haven't moved far, and when it comes to architecture, they're staying traditional. Their former home was a brick center-hall Colonial; the new place is also a Colonial, but more than twice the size. (See the slideshow below.)
One of Westchester County's most illustrious properties, the 19th-century estate spans 15,458 square feet with eight bedrooms, 13.5 baths, equestrian facilities, magnificent gardens, a greenhouse, tennis court and pool. The interior has been renovated, mixing sleek, new appliances with historic moldings and woodwork.
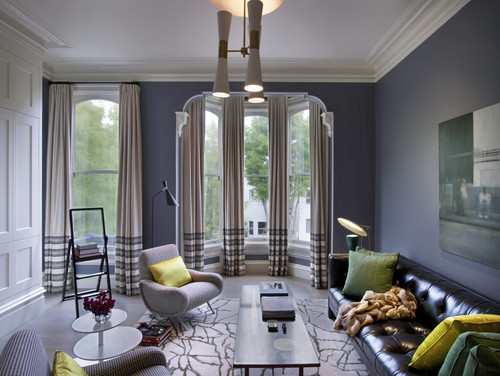
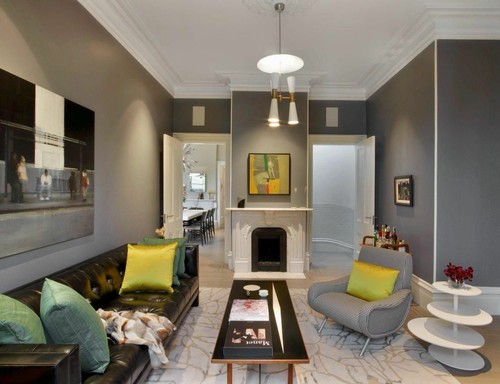
There was a lot to like about the living room in Brian Garrett and Stephen Fronk's 1878 Victorian flat. Located in San Francisco's Liberty Hill Historic District, the home had 12-foot ceilings and lovely architectural details. But the long, narrow layout and the lack of storage options for media made the space feel uninviting.
Turning to their friend and designer Sara Story for help, the pair created a welcoming living room that celebrates the beautiful architecture but has more warmth and better storage. Elegant window treatments, a new built-in enclosure for storage, a light gray wash on the wood floor and midcentury furniture and accessories transformed the space. "I really wanted them to use this living room," says Story. "This used to be the room that collected dust balls."
The living room is the first space that greets visitors, so it was important that the room feel inviting. Drapes were a top priority. "Window treatments are expensive, and we didn't have the experience or confidence to know what to do there," says Garrett. "Sara picked the fabric, and once you do it, you realize it's worth every penny."
The custom drapes are ivory cotton and silk with a contrasting black and cream striped hem. They dress up the tall windows and emphasize the room's height. "Drapes really create a formality to a room and add a glamorous element," says Story. "It adds an extra layer to the windows that creates warmth."
Adding a white built-in enclosure with millwork (seen on the left side of this photo) gave the owners the storage they needed.Abottom cabinet with drawers holds barware; an upper cabinet with folding doors opens to reveal a large TV. Separate cabinets hold media equipment and an automated home system.
The painting above the fireplace, purchased on a trip to Vietnam, inspired the living room's color palette, including the green and yellow silk pillows on the sofa.
The pattern in the large ivory wool area rug was inspired by the natural veining of stone and marble. The existing oak floor was given a light gray wash to make it feel a bit more contemporary. The walls were repainted the same Dior Gray the owners had used before. ("That was the one thing we did right," jokes Garrett.) It's a rich, saturated tone that envelops the space and highlights the living room's classic molding.
The left door in this photo leads to the dining room. The door to the right of the fireplace leads downstairs to the flat's front entry.
An oil painting by Oakland, California, artist Brett Amory was chosen for the prime spot over the tufted black leather sofa. The new sofa was just what the owners were looking for - timeless, stylish and masculine. "It's so comfortable and sophisticated at the same time," says Garrett. "It's also much more inviting than the Danish sectional we had before."
(Sofa: custom, Marco Fine Furniture; side tables: vintage Paul Frankl nesting tables, circa 1950; side table lamp: 1949 Control Lamp by Mitchell Bobrick, 20th Century Interiors)
The designer bought this vintage rosewood coffee table with a laminated black top, a white inlay and brass supports at an antiques store in Brooklyn, New York.
One of two existing gray houndstooth chairs was paired with a vintage floor lampto create a comfortable spot for reading. "Lamps and lighting in general give you a chance to add a sculptural form and create atmosphere," notes Story. "This floor lamp was an interesting form, similar to the chandelier above but in black."
A vintage 1950s Italian walnut bar cart with metal detailing bought at a local auction keeps entertaining supplies close at hand. Fronk bought the framed painting above it at a gallery in Hanoi, Vietnam.
Now the owners and their friends have a comfortable and stylish place for hanging out, instead of heading straight for the kitchen like they used to. "I think this room really embraces the architecture, but it's also functional for 2014," says Story.
ShutterstockAs much as they might like the idea of a fireplace, most homeowners don't use theirs regularly.
A fireplace can add ambiance to a room and value to a home. Many homebuyers say they would like their residence to have a fireplace. The reality is, most homeowners don't use their fireplace on a regular basis. Sure we pose for family portraits in front of the fireplace, but it's really the mantle that gets more daily attention, from displaying decorative vases and candles, hanging Christmas stockings, erecting framed art or mirrors above it. Without an ornate mantle, surround or decorations, frankly a fireplace would be rather boring to look at, and not much of a glorified focal point in the room.
But for those who love the idea of a fireplace, nothing generates debate over a home amenity as much as conversations about wood vs gas vs electric -- other than perhaps whether to leave the toilet seat open or closed.
Here's a look at some pros and cons of wood, gas and electric fireplaces.
Wood Fireplaces
Pros: If you love the crackling sound of logs burning, the smell of hickory and the ability to roast marshmallows or hotdogs over indoor open flames, this may be the choice for you. You can curl up with a glass of wine, a good book or a loved one on the rug in front of the flickering glow and feel the warmth on your face.
Cons: Don't mistake the warmth you're feeling on your skin from the fire as also warming the room or your home. Wood-burning fireplaces are quite inefficient as a heating source since most of the warm air is flowing up and out the chimney. And it's not just the warmth of the fire being pulled out of your home, so is the heat from other rooms. As the heated air rises through the chimney, the draft created pulls in other warm air from other parts of the house. That draft helps to suck in oxygen, which a fire needs in order to keep burning.
Note: The burning wood creates air pollution, inside and outside the home. That woodsy smell is actually a health hazard, and it creates Creosote, a byproduct build up that can coat the lining of the chimney and would need to be removed by a professional. (If you don't regularly bring in a professional to check out your chimney you increase your chances of having a chimney fire.)
Even long after the wood-burning fire goes out, you're losing warm air because you need to keep the damper open for about another 12 hours in order to keep the dying fire from depleting the oxygen in your home, thus you're losing even more heat after the fire goes out.
Solution: Use hard woods, such as hickory, ash, oak and hard maple for fuel, as they produce more heat than soft woods, such as pine and spruce. Thus you an offset the heat loss just a tad, but you're still losing more heat than you're bringing in. Also use doors to close off the fireplace when in use and when not in use.
Gas Fireplaces
Pros: If you don't want to bother with cleaning up soot, ash and burned-out logs, or having the smell of smoke seep into your sofa or carpet, then a gas fireplace is the answer.
Cons: If you don't have a natural gas line running into your home you would have to use propane gas. The propane tank would be sizable in size and stored outside the home. You can try to hide with with landscaping, or pay to have it buried under ground.
Electric Fireplaces
Pros: If you want a glorified room heater that adds better ambiance than a typical space heater, choose an electric fireplace, which are often just plug-and-switch-on. Most are quite portable. Tired of the fireplace on the North wall and want to move it the West wall of the living room, or maybe even move it to the master bath? Well, that is fairly easy to do. Electric fireplaces also tend to have a longer lifespan than gas fireplaces due to less corrosion of parts. Because electric fireplaces do not use a combustible fuel, they do not emit any harmful fumes such as carbon dioxide or carbon monoxide emitted respectively from natural wood-burning and gas-burning fireplaces.
Cons: If the power goes out, so will your electric fireplace. An electric fireplace also will cause an uptick in your energy bills, as electricity tends to be pricier than natural gas.
The flames in electric fireplaces aren't as realistic-looking as those in gas fireplaces. And because electric fireplaces are not permanent fixtures, they are not likely to add value to your home.
Which type of fireplace would you prefer and why? Tell us in the comments.
Stone floors are beautiful, sturdy and extremely long lasting -- and they can work in just about any room in the house. In fact, they are one of the only flooring materials (aside from perhaps concrete) that can be used both indoors and out with ease. If you are considering making an investment in stone floors for your home, these pros and cons can help guide your decision-making process.
Stone lasts forever. There is a reason the most ancient structures built by humans that are still standing are made of stone -- it's an incredibly strong, hardy material. If you are designing a home you hope to live in for many years to come, stone floors are a solid choice. Compared to wood floors, which will eventually require refinishing, and engineered wood floors, which may need to be replaced after a time, stone floors require very little maintenance.
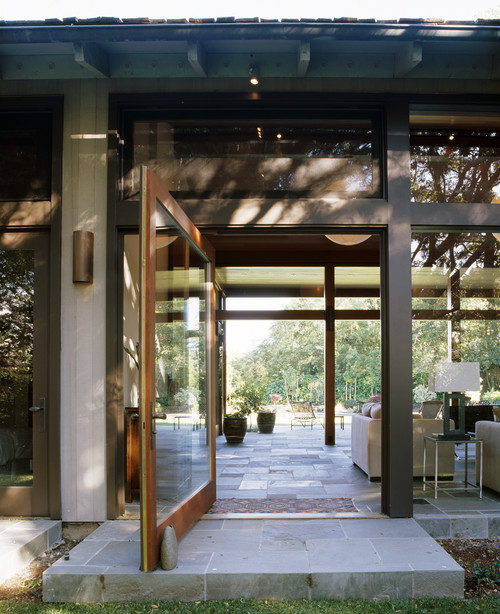
Stone used indoors and out creates a seamless flow. If you crave indoor-outdoor flow, using the same stone inside the house as outdoors is a great way to connect the two spaces. Especially when the stone is paired with large windows and sliding glass doors -- or even a pivoting wall, as shown here -- the effect is stunning.
Stone is naturally cool in warm weather. If your climate is warm or temperate, you will appreciate stone's natural ability to stay cool to the touch, even when outdoor temperatures climb. Padding barefoot across a bare stone threshold in summer is an utterly satisfying feeling.
Stone floors work well with radiant heat. If winters are cold where you live, radiant heat beneath stone floors is a luxurious, energy-efficient way to heat your home. Stone conducts heat well, making it a top choice for radiant heat systems.
Stone floors help keep allergens at bay. If you or a family member suffers from allergies, stone floors may help in your efforts to keep dust and allergens out of the house. The hard, nonporous surface does not give allergens anywhere to hide, making cleaning more effective. Even "porous" stone, like marble, is not very porous compared to materials like wood, cork or carpeting.
Cons of Stone Flooring
Stone is expensive. There is no getting around it -- stone is pricey. Choosing stone that is quarried locally is one way to cut down on costs, as shipping significantly boosts the price, but even a locally quarried stone floor costs far more than other options, like wood.
Stone floors can be cold. If your climate is colder and you do not have radiant heat installed beneath those stone floors, they may feel quite chilly in winter. You can, of course, warm them up with rugs, but any exposed areas of floor will feel cold on bare feet.
Wet stone can be slippery. The finish and sealant can help make stone less slippery -- ask your stone dealer for advice on the best methods for your application. But even with a honed finish, which is less slippery, stone can become quite slick when it gets wet. If you use stone floors in the bath or other areas where water may splash onto the floor, be sure to use nonskid mats.
Stone's strength can make falls more dangerous. Active kids and older people with more fragile bones are both at risk for potentially damaging falls on stone floors. China and glassware are also more likely to break when dropped on a stone floor.
Stone is really heavy. Stone flooring requires skilled installation, along with a substrate that can handle the additional weight. It is crucial to check with a pro before purchasing stone flooring to make sure you will be able to install it where you want.
A few weeks ago, we were lucky enough to tag along for the Denver Modern Home Tours, and we're excited to share this family-friendly space with you. This year's tours showed off four gorgeous homes from four Denver architects. This particular home, now owned by a family of four, was designed by Mike Moore of Tres Birds Workshop.
"The Quivas Street home is a great example of the modern, green homes we like to feature on our tours. Between recycled building materials, a green roofing system and technology-driven systems, it's a wonderful home all around and one that is really fun to be able to explore as a visitor," said Ken Shallcross, VP of Modern Home Tours.
We loved the quirky details and lived-in feel of the home, especially the kid's room.
What do you think? Would you enjoy living in this modern space?
Inspiration is the "aha" moment that precedes the creative process; it's the spark that stimulates the imagination -- and of course, hands down, there's nothing quite as inspiring as nature. The following is a peek at just some of the intriguing ways the pros and their clients have teamed up to bring the outdoors most definitely indoors. Granted, some of these creations are beyond the reach of most of us, but we can admire what inspired these design artists to do what they did. Using a bit of our own imagination, perhaps we will, in turn, be inspired to come up with wonderful ways to bring the outdoors in. The key in all the examples: calling on the elements and shapes of the local landscape.
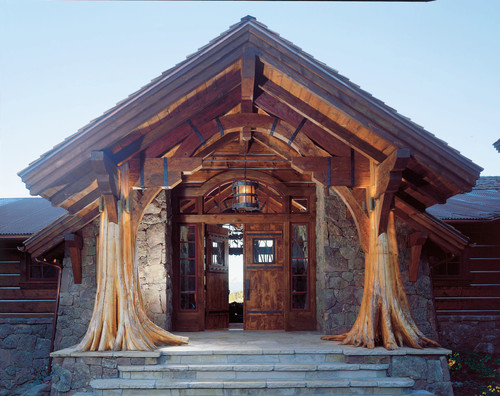
Fluted cedar pillars make the point that the architect and homeowner were inspired by trees. Located in Colorado's Grand County, which is 70 miles west of Denver and billed as the gateway to the Rocky Mountains, this home above represents a combination of mountain architectural styles, says Paul Miller, co-founder of RMT Architects outside Vail. The centerpiece of the home, as Miller notes -- and as we can surmise by the photograph -- is the front entrance, "anchored by two huge trees."
The property is called Hat Trick Ranch, and there is a surprise in store beyond the threshold. As seen below, the trees come indoors. The cedar tree trunks are the organic underpinning of the design, but the details help hold it together, literally in the case of the custom metal connections and strapping. Also part of the detailing: Engelmann spruce and lodgepole pine logs.
The beauty here, beyond what one sees, is that the trees themselves got a different life. According to RMT architect Chad C. Salter, "The trees were standing dead and would have most likely been chipped due to the odd shape. We reused the whole tree by having them hand dug below the grade line and craned out without falling." The trees are structural and came from Spearhead, a manufacturing company specializing in architectural timber and steel.
To get rid of any bugs, the trees were radio-frequency kiln-dried before they were milled and installed onsite. RMT didn't do much to embellish the natural beauty of the wood, other than apply a clear lacquer finish -- creating a picture-perfect indoor grove fit for a fairy tale.
Trees were also the inspiration for another Colorado home. This one is in the Settlers Creek development in Summit County -- ski country high in the Rockies -- where the elevation begins at 8,000 feet and soars to 14,000. Windows are the focal point, framing a spectacular view of the forest around the property and the Snake River winding below. (See the Settlers Creek residence.)
Western red cedar is the tree of choice, but the bark is intact -- and that's the creative application to the initial indoor tree inspiration. The idea was to alter perception: With the bark left on the trees, the glass appears to be integrated with, not separate from, their trunks.
Cedar soars in this grand room above, and it's an example of how easy natural wood adapts to home design if it's "treated" well. Here the cedar finish, from Osmo North America, doesn't alter the wood but helps maintain its color, allows it to breathe and also allows it to expand and contract naturally during changes in humidity (important for indoor use), says Osmo's David Kirby.
The application process involves scrubbing the finish into the surface with a natural bristle brush. Tip: "Don't lift the brush until it stops giving finish," Kirby advises, noting that since it isn't applied in layers, "it's important to work the finish into the surface, as opposed to merely brushing it on."
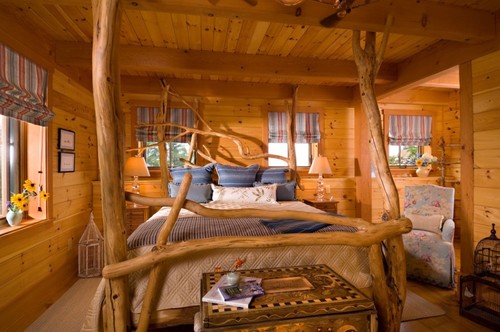
If this bedroom above seems cozy to you, that's because it's exactly the sensation that designer Laurel Feldman of Highland Park, Illinois, was aiming for. Birds were the theme requested by the client for this guest bedroom in Vermont. "So, naturally," says Feldman, "I needed branches for my imaginary bird visitors to nest and land in!"
Inspired by the landscape "and the wondrous maples and pine trees," she says, Feldman beamed and covered the walls with pine to suggest a birdhouse. The bed is the tree, its branches extending to the ceiling and connecting with the bed's headboard and footboard -- all to help dreamers feel as if "they are sleeping up high in a tree," she says.
Of course, trees aren't the only source of inspiration. Architect Anne Fougeron of San Francisco considered both light and the land itself to create the Fall House, a modern glass beauty 250 feet above the Pacific Ocean along California's Big Sur coastline. The vacation home is two rectangular boxes connected by an all-glass library-den. (See the Fall House in Big Sur.)
But how it sits on its perch is the story: Fougeron's vision, as she notes in her description of the property, was to embed the building "within the land, creating a structure that is inseparable from its context." Cantilevered over the bluff, the home combines both shelter and exposure through the use of floor-to-ceiling windows facing the ocean view and a copper facade on the slope side that wraps over the roof, "offering a retreat from the forces of nature," she says.
As an aerial photo attests, the house does fulfill Fougeron's objective: to design a structure that "conforms to the natural contours of the land and the geometries of the bluff." And it does so through its long, thin lines and a responsive structural system that honors the natural shape of the land. It's organic architecture, taking its cue from the lay of the land -- even to the point of a comparison, as Fougeron offers in her project description, to the malleable qualities of "the banana slug native to the region's seaside forests."
Located in the foothills of the Santa Catalina mountains in southern Arizona, a custom modern home by McMahon Design Build of Tucson has a dominant feature that takes strength and connectivity from the outside in as its cues: a stone wall that runs unbroken through the house, starting at the outdoor front entry and ending in the backyard. (See the project.)
The inspiration for the stone veneer wall -- the veneer is composed of a lightweight concrete formed and colored in a desert palette and laid in a random pattern - was the desert landscape and the multiple granite rock formations on the property, says McMahon Design Build's Jim McMahon.
Inside, the wall separates the living area from the private bedroom suite and home office. It terminates poolside. As a design element, the wall anchors the house to its environment. And it does what McMahon and the homeowner set out to do: "further emphasize Tucson's ever-important indoor-outdoor relationship by actually creating an outdoor-indoor-outdoor connection," says McMahon.
Chances are if you've got a spare bedroom in your home, it's not really "spare" for anything and is more likely a holding place for stuff you don't know what to do with. But someday, either through massive cleaning or a child moving out and leaving you with an empty nest, you'll be lucky enough to have a spare bedroom that's empty and that you can do something with.
Turning it into a home gym can be an easy first choice. But if you really want to use the room for more than an hour a day and do something creative with it, you'll be better off putting the home gym in the garage.
Here are eight ideas for turning a spare bedroom into a dedicated space to pursue your dreams and enjoy your home a bit more:
JustyCinMD/FlickrGet a fresh look for even worn-out plastic lawn furniture with the right application of spray paint.
Want to give your home a fresh, updated look? Consider spray painting.
No, I'm not suggesting graffiti art (although that's beautiful, in the right settings). I'm talking about spray painting some detail or element within your home. You might coat a window with translucent silver and white, for example, to create a restrained "stained-glass" effect. Or you may decide to mask the 1970's lime-green ceramic tiles in your guest bathroom with a more neutral tone.
Still dubious? Let me reassure you: I'm speaking from experience. I saved thousands of dollars by spray-painting my fence, instead of replacing it.
You see, the former owner of my house installed a basic grey chain-link fence around the backyard. Over the years, the fence devolved into an eyesore, and by the time I bought the property, that fence was all-but-screaming "replace me!"
But installing a new metal fence would have cost thousands. Instead, I spray-painted it with a matte black finish, which instantly updated the look of the fence, for a fraction of the cost of a replacement.
Spray-painting may not be a traditional way to upgrade your home, but it's versatile, quick, and inexpensive.
How do you spray paint effectively? Just follow the steps below.
Spray Painting Glass: You can spray paint glass surfaces, such as windowpanes, tabletops, mirrors, or vases. Here's how.
1. First, work the glass over with either 80-grit sandpaper or a chemical etcher. Whichever one you happen to have on hand will work.
2. Next, clean up by removing any dust or dirt on the surface of the glass. Apply a fast-drying glass cleaner to a paper towel and wipe the surface clean. Wait until it dries to move on.
3. Since glass expands and contracts with the temperature, you should prime the glass to make sure that the finished product looks smooth. (This step is optional, but recommended.)
4. Finally, get to spray painting! Stand 10-12 inches away from the glassnand follow any directions for drying that the manufacturer gives on the label. You shouldn't have to wait too long in-between spraying if you want to give the glass a second (or third) coat.
Spray Painting Metal: Want to touch up a file cabinet, bicycle, light fixture, or appliance? You can use spray paint for that, too. A little tip: it's worth it to splurge on a higher quality metallic spray finish, as it contains real metal particles. This will give your object a smoother coat and glossier finish.
1. Get rid of any flecks of rust by using a chemical rust remover, a wire brush, or 120-grit sandpaper. If there is oily residue on your item, put mild dish detergent on a damp rag to rub it off. If there's stubborn residue, use denatured alcohol to remove it. Let your object dry fully before moving on.
2. Get rid of any glossiness by sanding the surface down. Be on the lookout for any dings or chips on the surface. Use a dry tack cloth to remove any dust.
3. Prime the surface, as this will seal and smooth uneven surfaces, help the paint stick, hide stains, and allow the color to come through properly. Wait for everything to dry again as per the can's instructions (about 1-2 hours).
4. Time for painting! Make sure you're holding the can 10-12 inches away, and spray back and forth repeatedly in the same direction.
Spray Painting Plastic: The shutters on your house are a great example of a plastic surface that you can spray paint. If you're bored of having the the same colors as everyone else, spice it up! The same goes for garbage pails, outdoor furniture, or laminate surfaces. Follow these steps to get a fresh look.
1. Use ammonia-based cleaner on older plastic surfaces, and paint thinner on newer surfaces, to ensure that what you're spray painting is spotless.
2. Use fine-grit sandpaper to roughen the surface. You can use a tack cloth to clean up any dust or debris.
3. Optional: prime the surface.
4. Paint your surface. Follow the same directions as stated above of standing 10-12 inches away, and adhere to the guidelines on the can.
Spray Painting Porcelain and Ceramic: Looking to give a little more life to a bathroom? You can spray paint the sink, bathtub, and tile. Other ideas include flowerpots, servingware, and brick.
1. Scuff up the glaze by using 80-grit sandpaper. (If your item is unglazed, start with step 2.) The best way to do this is to create an "X" shape on the surface to make sure you've removed any slickness. Begin on a diagonal, and then cross the area you just sanded in the opposite direction.
2. Use a tack cloth to clean up.
3. Apply your primer.
4. Get painting! You might have to use more than one coat.
Spray Painting Wood: If you'd like to give a piece of furniture a makeover, spray painting is a great way to do it. You can also use spray paint on wicker furniture, wood composite, and cork.
1. Remove all the hardware on the piece (like handles and knobs). If you don't feel confident in putting the hardware back on after you're done, cover it up as best as you can with painter's tape, newspaper, or plastic.
2. Sand down the surface and smooth it out. The surface should be scratch-free. If you're working with a small piece, use one sheet of medium-to-fine grain sandpaper. Liquid sandpaper can be used for larger pieces.
3. Clean the sawdust off by brushing it, dusting it, or vacuuming it up. Don't use a wet rag -- you'll have to wait for the surface to dry.
4. Spray the primer on before the paint, and then go to town with your spray paint once the prime has time to dry and cure.
Paula Pant owns five houses -- yes, five. No, she's not rich, but she's a real estate investor who built a portfolio of rental properties that cover her entire cost-of-living. She's 30 years old, and she invites you to check out all the details about her real estate purchases -- including the numbers -- on her blog, Afford Anything.
ShutterstockBefore putting a cardboard box out with the recyclables, consider some fun ways to reuse it around the house.
Like rabbits or dust bunnies, cardboard boxes somehow multiply when they arrive at a house. They arrive in a variety of ways, such as from a moving truck carrying your pots and pans, to a delivery van bringing boxes of gifts that you bought online.
However they get there, cardboard boxes can quickly clutter a home if they're not cut down and put out with the recyclables. An option to destroying them, however, is finding fun ways to use them around the house. Here are some useful and fun ways to reuse cardboard boxes:
1. Toys for kids. Give a small child a big box, and you've got a full day's worth of play in hand. They can crawl in it and use their imaginations for an adventure, turn it into a rocket or car, make an arcade, or use it as a hideout for the day. The bigger the box, the better.
Bob Sherman, 77, and retired in Glenview, Ill., says when he was a kid, he and his friends would slide down steep hills on boxes, "sometimes twirling on the way down, with the help of someone at the top giving us a twist, and landing in a pile of leaves at the bottom."
Another idea: "We each got inside a box so we couldn't see, then ran around bumping into each other and falling down," Sherman says. What could be more fun for a kid?
2. Make a sign. Cut off part of a cardboard box and write on it for a yard sale sign. It's free and you won't have to buy signs to advertise your garage sale. Use magic markers and paint to draw photos or words to attract shoppers, as New Jersey resident Shad Ronayne did.
3. Litter box or play area for a cat. A medium or shoebox can be turned into a litter box for a cat. The animal shelter in Edison, N.J., for example, accepts donations of such cardboard boxes for quick and easy litter pans, Ronayne says. A box can also be turned upside down with a hole cut out of the end and placed on top of a litter box for the cat to have some privacy, and to give you a chance to not have to see the mess.
Like children, cats also love to hide in boxes. Heidi Hecht, 32, a secretary in Benson, Ill., says she saved some boxes for her cats to play in after she moved. Hecht also took some boxes to her local recycling center.
4. Working outside. Instead of lying on the cold, hard cement when changing your car's oil, or kneeling on hard dirt when pulling weeds, either flatten out a large box or fold over a box a few times to create a landing spot for your back or knees. Writer David Baake, 48, of Atlant, says that he flattens large cardboard boxes to lie on when changing the oil in his car.
5. Cardboard swimming pool. This requires a lot more than a few old cardboard boxes. It takes a lot of work and supplies from a hardware store, such as contact cement and hardrock coating to make the pool waterproof. Lue Nuwame, 37, of Mississauga, Ontario, Canada, has a YouTube channel devoted to helping people re-use cardboard boxes and other scrap. He also makes chairs, skateboards and costume props.
6. Recycling box. Using a recycled cardboard box as a box to put paper in to be recycled is a good example of recycling. Draw a recycling symbol on the side of the box and keep it near your desk to make paper recycling easier. Or put it in a corner and toss old paper in it from your chair as a fun work break.
7. Filing. Rather than spending money on real filing cabinets, use old cardboard boxes to store important documents. Medium-size boxes are perfect for filing, and labels can be added to separate documents.
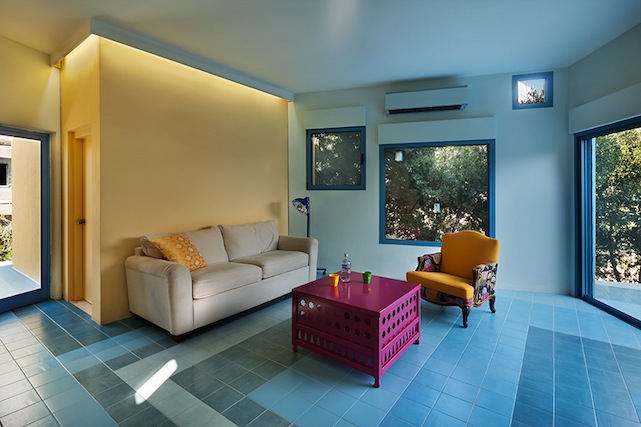
Courtesy of Assaf PinchukA ductless heating unit occupies a space near the ceiling in this modern home, but they can adapt to older homes too.
One of the latest and most popular innovations in heating and cooling your home not only saves energy, but is compact, cheaper to install and can be set up without tearing down walls.
Ductless heating and cooling systems, also known as mini-splits and ductless heat pumps, are growing in popularity around the world because they are a highly efficient heating and cooling option for homes. They were introduced to this country just 30 years ago from Japan and have been growing in popularity ever since. According to Navigant Research, by 2020, ductless systems will account for nearly 30 percent of all energy-efficient HVAC systems revenue.
Mini-split systems don't require ducts, which is where many homes lose energy. In retrofits, it is much simpler and less expensive to install a ductless system than one that requires ripping out walls and ceilings to install ducts.
These systems are also small in size, cost less to install than traditional HVAC systems, and use a fraction of the energy, substantially reducing utility bills. Energy Star-qualified systems can reduce cooling and heating costs by 30 percent. Newer models are continuously coming on the market, that are increasingly efficient.
The perception has also been that mini-split systems do not work in colder climates. However, according to Mike Smith, senior marketing manager for residential products at Mitsubishi Electric , their hyper-heating mini-split ductless systems are suitable for anywhere in the United States. He says one model can heat or cool at full capacity* when it is down to 5 degrees Fahrenheit outdoors. According to Smith:
"Low ambient heating technology is on the rise, allowing ductless heat pumps to function in low ambient outdoor temperatures. This capability is significant for two reasons: It means that ductless zoning technology is a viable solution for residences across the country even in colder climates like the Midwest and New England where heat pumps were not previously considered the best option. Also, hyper-heating technology frequently eliminates the need for supplemental heating, making the ductless zoning system the only system needed for total comfort control. This saves installation time, and improves energy efficiency without relying on fossil fuels. "
Mini-split systems tend to cost more initially, but they pay for themselves over time in energy costs. Smith says:
"The price of an installation will vary greatly depending on the specifics of the home. For retrofits that lack ductwork (e.g. adding air conditioning to a hydronic system) or additions where the central system lacks adequate capacity, ductless systems often provide the lowest first cost and least disruption to the building and its occupants. In new construction, the initial equipment cost of a ductless system may be somewhat higher than conventional equipment, but total lifecycle cost savings justify the initial equipment cost. Because of the systems' high efficiencies, they often qualify for utility rebates, which can significantly offset the equipment first cost."
In the past, many homeowners were reluctant to use these systems because they didn't like the look of the interior units. However, the interior units can now be recessed in the ceiling or mounted near the floor so they are less apparent than the units installed on the upper wall. Check out some of these installations in the attached gallery.
Mini-split ductless systems are composed of three main parts: An indoor air-handling unit, an outdoor compressor/condenser unit, and a remote control that operates the system. A smart phone or computer can also control some units.
Heat is transferred using refrigerant expansion and compression, in much the same way as a refrigerator works. During the colder months, heat pumps move heat from the cool outdoors into the warm house, and during the warmer months, heat pumps move heat from the cool house into the warm outdoors. They move heat rather than generate heat, so they can provide up to four times the amount of energy they consume.
Because these systems don't have ducts, they avoid some of the energy losses associated with central forced air heating and cooling systems, particularly when the ducts are in unconditioned spaces. One outdoor condensing unit can be used for up to eight indoor air handlers in different zones of the house, each controlled to meet the needs of certain rooms.
The number of heat pumps required will depend on the size of the home and how well insulated it is.
Each of the zones will have its own thermostat so only the occupied rooms can be conditioned, saving energy and money. Some units are self-correcting -- so they can increase or decrease output depending on the set temperature.
For further information about ductless heat pumps, see Energy.gov website. Some of the suppliers of ductless mini-splits are Mitsubishi , Fujitsu , Lennox and Trane.
* "Heating capacity" is an HVAC term meaning at what level the system is operating. 100% heating capacity means it's operating at its most efficient state. The system will still work below 5 degrees F but it won't be at full capacity, it will be operating less efficiently but it will still be operational.
Squaring a project's goals and budget -- often two very different things -- is a common problem architects and homeowners confront in a project's earliest planning stages. The two almost never align when we begin. Working to reduce the size of the overall project is the best way to affect the cost early on, when little is known about the structure, its finishes or any of the details.
Reducing square footage, however, doesn't have to be drastic. In phased construction, you purposefully plan for and delay building select components of a project. In the long run, the overall cost to build a phased project is higher, but the startup costs are substantially lower. This allows a smaller initial project to be constructed, and a strategic master plan provides the structure for future additions as finances allow. A smaller initial project footprint, as we'll see, also leaves room to change your mind along the way.
If you absolutely can't part with any square footage in your plan, you might consider the following when evaluating whether phasing is right for your project.
Advantages of Phased Construction
A lower initial investment. Spreading the cost of construction over a longer period of time can allow larger undertakings to be done in affordable pieces. Sometimes it's the only way a project is attainable.
Shorter construction time. A smaller scope of work results in an abbreviated construction schedule.
Experience. Living in your partially completed home can offset the cost of housing during a long-term construction endeavor. It also helps to inform future decisions (you'll know how you actually use the home), and it gives you a real-world sense of the scale of your home - many people have a hard time understanding scale through drawings alone.
Allows for design changes. Living in your home may reinforce or alter previous design selections. You may decide you don't actually need the work planned for future phases or that the separate guesthouse you planned for in phase two might actually work better attached to the home.
Complexity. For all parties involved, a phased project is inherently more complex. There are more drawings and more trips to the site; there is more coordination ... the list is long.
Longer time to fully realize the project. Phasing purposefully delays construction. An incomplete home is acceptable to some, but for others, life in a work in progress just isn't enjoyable.
Higher overall costs. Few things get less expensive with time. Delaying the purchase of materials, labor, design and engineering means you'll probably pay more. Financing and permitting costs must be factored in too.
Living in a construction zone. Many phased projects leverage the fact that you can live in a part of the home during construction. But working around finished spaces (and homeowners) makes for inefficient workflows for all of the building trades. Dust, debris, construction traffic, work schedules and noise are just a few of the hazards that make for stressful times and must be managed. Contractors and homeowners alike find these situations disagreeable for different reasons, and most people underestimate their tolerance for the general messiness of construction.
Allows for design changes. Both a positive and a negative, yes. Because the work is completed over time, it can be tempting to change the design at every turn.
Alterations to complex interwoven, phased projects can be costly for obvious reasons. I encourage clients to resist the temptation to change the design and second-guess every decision, and to trust that their objectives were met as a result of the design process.
Minor changes are completely sensible, but rethinking major aspects of the project when it's under way is disruptive to everyone involved, and you'll pay a premium for the privilege.
If you think a phased approach is right for your project and it requires a lender, begin with that.
Financing. Securing financing for a phased project can be more complicated. Lenders tend to shy away from the unknown, and phased projects don't look like "normal" projects. Phase one may be a complete renovation of a second floor, leaving the first floor unchanged. That can be a hard thing for a lender to assign a value to. Phasing leaves a lot of room for interpretation with respect to market value and completeness -- on both sides.
And for you, prolonging the construction phase can substantially alter the real cost of the project. A discussion with your lender may reveal that tackling the entire project at once in lieu of a phased approach is actually more cost effective.
With the financing concerns addressed, it's time to consider how the pieces of the puzzle will fit together.
Master plan. I always recommend completing a master plan up front to define the full scope of the project from the beginning. The complete picture is necessary to fully appreciate all of the factors in play. Completing the design all at once preserves design momentum and ensures that the project will be executed with a consistent vision. It also prevents leaving out or forgetting critical pieces of infrastructure along the way.
This will increase design fees in the beginning, but it's actually a much more efficient process. Once the entire project is conceptualized and planned out, detailed design work for the individual phases can be deferred until needed.
Phasing plan. As part of the master planning exercise, a phasing plan should be developed. This describes in both general and detailed terms what will be constructed and in what sequence. Documenting the vision at the outset also allows all parties to plan for an efficient construction process.
The phasing plan must be developed to carefully consider the interdependence between systems and aesthetics.
If you decide not to implement future phases of the work, is there a danger that the house will appear partially complete?
Is something in phase two actually a necessary element -- that highly efficient boiler, for example? Are the systems implemented in phase one properly sized to accommodate future phases?
You can start to appreciate the complexity of the exercise.
The phasing plan can also help your contractor to consider the bigger picture with respect to ordering materials.
The contractor may advise you that ordering all of the framing for phase two along with that for phase one will save you a full 25 percent in material costs.
You may decide to purchase it all in phase one and store it onsite, or you may decide it's not worth the hassle.
Other Considerations
Sequencing and site access. The natural order of construction requires thought too. Tracking an excavator across the phase-one koi pond is counterproductive.
Contractors are highly skilled at visualizing the means and methods that construction requires. Involving them during phase planning and design is important. They'll likely advise that the tighter the building site is, the more sequencing comes into play.
You wouldn't want the first building phases to block access to later phases of the work or render something altogether impossible to build. Aside from just avoiding disaster, clever planning can result in cost savings too. For example, allowing for a future wing's foundation to be poured as part of phase one while access is open and free and the equipment mobilized could result in a substantial cost benefit. Subsurface infrastructure -- things like drainage, utilities and sewer lines -- deserves a careful look at this time too to be sure it can accommodate future building footprints and grading.
Close collaboration between your contractor and everyone on the design team is essential to craft an efficient phasing plan.
Permitting. Because building regulations change regularly, pulling the building permit early will protect against any legal frameworks that may scuttle one or more of the project phases. This is especially true for projects designed at the margins of what's possible on a site. Secure permission for everything that's been planned before setting out to complete phase one.
If your site is straightforward, this is of less concern, but homeowners on sites with wetland impacts, coastal restrictions, strict zoning constraints or other regulations should confront these issues early in the design process, long before construction starts. The protracted timelines involved with phased work mean that it's completely plausible that the project you invested lots of design time in is no longer possible to construct.
Mobilization. Moving machinery, equipment and labor to and from a jobsite multiple times -- known as mobilization -- is costly in both dollars and time.
This can account for a large part of the added cost of phased projects; it's just less efficient.
Here too your contractor can help define the added cost and schedule setbacks due to mobilizing subcontractors and building trades multiple times. This shouldn't be underestimated.
Project scale. Partitioning a project into bite-size pieces may seem like a great idea when you're looking at containing costs early on. However, you may be unintentionally introducing a constraint on the project in the form of project scale. This is because contractors often look to fill their schedules with consistent work of a certain scale. A large project divided and carried out over a period of years may actually be less attractive to your contractor of choice, because at any one time it's just not enough work to keep the crew busy.
When phasing is viewed as a whole, it's easy to see why it is usually the more expensive option. However, the phased approach can still makes sense when the right set of circumstances presents itself.
When it's a known project goal from the beginning, the design can offset some of the liabilities phasing presents. If starting and stopping points can be clearly designed or the project can be conceptualized as a series of separate but connected pavilions, distinct wings or autonomous outbuildings, physical separation is designed into the project. This separation helps the homeowner and contractor coexist, clearly defines the scope of work for everyone involved and actually makes for an interesting living concept too.
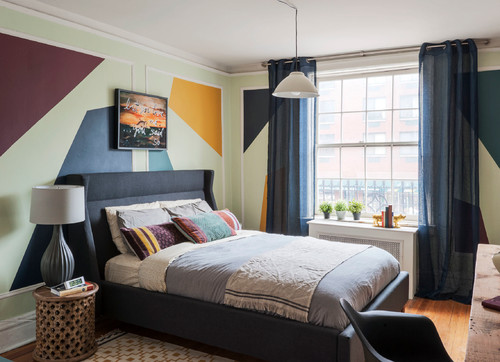
The owner of this New York City apartment had experienced a lot of change in the years he'd lived there. But while he had graduated, had taken a job and was building profession, the space had remained a time capsule. He hired Lindsay Boswell and Ali Levin of LABLstudio to remake his place in his current style.
Who lives here: A thirtysomething professional. Location: West Village neighborhood of Manhattan. Bedroom size: 140 square feet (13 square meters). Tip: While the designers used a mix of high- and low-end items in this home, they recommend spending money on a quality bed. "It's a big piece, and you spend a lot of time there," says Levin.
The showstopping move is the geometric forms painted on the walls of the bedroom. "From the start we imagined geometric shapes on the walls," says Levin. "It's a great prewar walk-up with original molding. We wanted to do something that would give the room a new look, draw attention to the molding and tie together the colors in the room."
The designers used Photoshop to design a pattern on the computer, and with that as a model, outlined the shapes on the wall with blue tape before applying the paint themselves. "We tweaked the design a bit once we mapped it out in tape," says Levin. "But the end result looks a lot like our initial image."
The pale sage background makes the molding and the accent colors stand out. "We like doing things that are a bit different," says Boswell. "We didn't want to use bright white, because we felt it would make the room cold."
This design duo is not shy about sourcing from anywhere and everywhere. For example, the bedside table is from Cost Plus World Market, and the lamps are from Urban Outfitters. But when it comes to large upholstered pieces, they suggest spending as much as you can afford. "Pieces such as a bed or a sofa set the tone for the entire room," says Levin.
Another key piece is the print by artist Rene Ricard. "We loved it because it has a seriousness and a playfulness," says Boswell.
An example of a cost-saving piece is the turquoise-colored dresser from Ikea. "The color was perfect," says Levin. "And sometimes the best piece isn't the most expensive one."
However, the client invested more in a custom desk. "When we first met with him, he had a large, chunky desk and a big media center," says Boswell. "But we all came to the conclusion he did not need that much storage."
She continues, "This client needed a place to stow his laptop, his remote control and a single drawer. Because the walls are so old, hanging the television on the wall was not an option, so he also needed a place to put the TV. This wide and narrow piece holds it all and works much better in the space."
Today the client has a space that fits his current lifestyle. "Your home should truly reflect who you are now," says Levin. "I think it's a space he can feel proud of."